Introduction
You have a logo that’s ready to make its mark. It represents a brand, a team, or a big idea, and now you want to see it translated into the precise, durable medium of thread. If you’re working with the industry-leading precision of a Barudan embroidery machine, you know the final step is all about the file. Specifically, the PCS format. The process to Convert Logo to PCS Embroidery File is the critical bridge between your digital artwork and a flawless stitched result on a Barudan. This isn’t a simple export; it’s a specialized craft of translation and engineering.
Whether you’re a shop owner aiming for production perfection or a digitizer looking to master the Barudan ecosystem, this guide will walk you through the principles, tools, and techniques needed to create PCS files that make your logo—and your machine—look their absolute best.
Understanding the PCS File: The Barudan Blueprint
First, let’s define our target. A PCS file (often associated with the .PCS extension) is a native embroidery file format for Barudan machines. Think of it as the machine’s mother tongue.
This file is far more than a picture. It’s a dense set of industrial-grade commands that tells a Barudan machine:
-
Precise Coordinates: The exact X and Y position for every needle penetration.
-
Stitch Type Data: Instructions to create satin stitches, fill stitches, and run stitches with Barudan’s specific algorithms.
-
Machine Functions: Commands for trims, color changes, and sequencing optimized for Barudan’s high-speed operation.
-
Optimized Data: Information structured to leverage Barudan’s renowned registration accuracy and smooth running.
You cannot simply rename a .JPG to .PCS. Your logo needs to be reinterpreted into this language through a process called digitizing. For Barudan, this means engineering for unparalleled precision.
The Mindset: Precision Engineering for Precision Machinery
Barudan machines are synonymous with accuracy and reliability in commercial embroidery. When you Convert Logo to PCS Embroidery File, you must adopt an engineering mindset to match the machine’s capabilities.
This means your goal isn’t just a visual match. It’s about creating a file that:
-
Runs Flawlessly at High Speed: Barudans are built for production. The file must be structured to prevent thread breaks, jumps, or registration shifts even at top operating speeds.
-
Leverages Barudan’s Strengths: The machine’s precise trimmer and consistent stitch formation should be accounted for in the digitizing plan.
-
Ensures First-Time Success: In a production environment, there’s no time for test-and-guess. The file must be right from the first stitch.
Phase 1: Logo Preparation – The Foundation of Fidelity
A perfect PCS file starts with a perfectly prepared logo. This step is about optimization, not alteration.
1. Secure the Vector Source:
-
This is non-negotiable. Always start with the original vector file (.AI, .EPS, .SVG, or a true vector PDF). Vector graphics are made of mathematical paths, giving digitizing software clean, scalable lines to follow. This is the single biggest factor in preserving the sharp, clean edges of your logo. A pixel-based JPG introduces guesswork and blur.
2. Simplify for the Medium:
Examine your logo with the reality of thread in mind:
-
Minimum Stroke Weight: Any line or detail should be at least 1mm thick to stitch reliably. Thinner lines may require altering to a run stitch or slightly enlarging the element.
-
Simplify Small Text: Lettering under 0.2 inches (5mm) tall becomes challenging. Consider using a bold, simple font or slightly increasing the size.
-
Rationalize Colors: While Barudans can handle many colors, simplifying a gradient from 6 shades to 3 solid colors often creates a bolder, more stitchable logo. Use stitch direction, not just color, to create depth.
This preparation ensures the digitizer (you or a professional) is working with the best possible blueprint.
Phase 2: The Digitizing Process – Translating Art to Industry-Grade Instructions
This is where your logo is engineered into stitches. For a Barudan PCS file, several techniques are paramount.
Key Pro Techniques for Barudan:
-
Underlay: The Structural Framework: Never skip this. Underlay is the hidden foundation that stabilizes the fabric, prevents puckering, and makes top stitches look crisp. For Barudan files, underlay must be robust enough for high-speed operation. Common choices include:
-
Edge Run Underlay: For satin columns.
-
Zig-Zag or Cross-Hatch Fill Underlay: For large fill areas to lock the fabric down.
-
-
Stitch Type with Intention:
-
Satin Stitches: Use for borders, lettering, and any element needing a glossy finish. Control the width precisely.
-
Fill Stitches: For solid areas. Vary the stitch angle in different sections to add visual interest and prevent fabric distortion.
-
Run Stitches: For fine details and small text. A pro might use a run stitch underlay for small satin columns to add stability.
-
-
Pull Compensation – The Accuracy Adjuster: Thread pulls fabric. Without compensation, circles become ovals. A pro digitizer applies slight outward adjustments (typically 0.1mm to 0.4mm) to shapes so they “pull” into the correct form. This is critical for geometric logos.
-
Efficient Sequencing & Trimming: Barudan’s trimmers are fast and precise. Structure the stitch order to group all objects of the same color together, even if they’re not adjacent in the design. This minimizes color changes and trims, reducing runtime—a crucial factor in production efficiency.
Phase 3: Choosing Your Digitizing Path
You have several routes to a high-quality PCS file, each with different trade-offs.
Path 1: Barudan’s Official Software
Barudan offers its own professional digitizing software (like the BDS series). This is the most integrated path.
-
Pros: Guaranteed 100% compatibility and access to every machine-specific function. It’s engineered in tandem with the machines.
-
Cons: A significant investment, and it has a steep professional learning curve.
-
Best For: Large shops and dedicated digitizers who live in the Barudan ecosystem and need absolute control.
Path 2: Industry-Standard Professional Software
Wilcom EmbroideryStudio is the benchmark used by most professional digitizing services worldwide.
-
Pros: Unmatched depth of control over every stitch parameter. It exports impeccable PCS files and is the tool of choice for creating bulletproof production files. Its ability to fine-tune underlay and compensation is exceptional.
-
Cons: Expensive and complex. It’s a professional tool for professional users.
-
Best For: Anyone who needs to produce commercial-grade PCS files for clients or in-house production.
Path 3: Professional Digitizing Service
This is often the smartest and most reliable choice for a specific logo.
-
How it Works: You send your vector logo and specifications to a specialist. They use software like Wilcom to create an optimized PCS file for you.
-
Pros: You get a guaranteed, production-ready file from an expert who understands Barudan requirements. No software cost or learning curve.
-
Cons: A per-design fee (typically $25-$80 depending on complexity).
-
Best For: Businesses with occasional needs, complex logos, or those who want a perfect result without investing in software and training.
Path 4: Prosumer Software (With Caution)
Software like Hatch Embroidery can export to some Barudan formats.
-
Reality Check: While Hatch is excellent for many purposes, its PCS output may not utilize Barudan-specific advanced functions to the fullest. It can be a good option for simpler logos or prototyping, but for mission-critical production, the professional paths above are recommended.
Avoid Online Auto-Converters: Websites that promise instant logo-to-embroidery conversion will fail. They create files with no underlay, poor stitch choices, and jagged edges—completely unsuitable for a Barudan.
The Professional Workflow: From Vector to Verified PCS
-
Import & Set Final Size: Import the vector logo into your digitizing software. Immediately set the design to the exact physical print dimensions (e.g., 3.5 inches wide).
-
Create Objects from Paths: Convert the vector paths into embroidery objects. Each shape becomes an editable element.
-
Apply Structural Settings: For each object: select stitch type, add appropriate underlay, and input pull compensation values.
-
Optimize Sequence: Re-order objects to group colors, minimizing trims and jumps. This planning is key for efficiency.
-
Simulate & Analyze: Use the software’s 3D simulation. Zoom in to check detail fidelity, stitch density, and registration.
-
Export to PCS: Export the final design, selecting .PCS as the format. You may need to select your specific Barudan machine model.
-
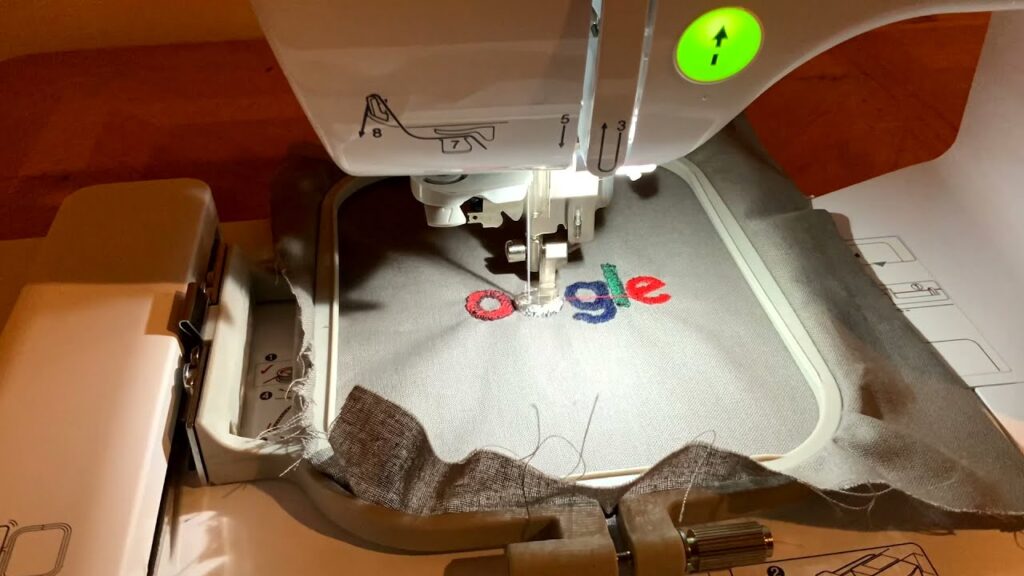
The Mandatory Machine Test: Stitch the PCS file on a scrap of the actual production fabric using your Barudan. This is the only way to verify density, stability, and overall quality. Adjust the digital file based on this real-world test.
Conclusion: Precision from Pixel to Stitch
Successfully learning how to Convert Logo to PCS Embroidery File for a Barudan machine is a commitment to quality. It acknowledges that the machine’s legendary precision is only unlocked by an equally precise digital file. It’s a process that blends graphic design with textile engineering.
For most businesses, partnering with a professional digitizing service that uses Wilcom software is the most reliable and cost-effective path to a perfect PCS file. It ensures your logo is interpreted with the expertise that Barudan machinery deserves.
By respecting the process—starting with vector art, insisting on proper underlay and compensation, and always conducting a physical test—you guarantee that your logo is not just converted, but masterfully translated. The result is an embroidered emblem that carries the full weight and clarity of your brand, stitch after perfect stitch.