Installing a UPVC door lever may seem like a straightforward task, but doing it correctly ensures both the security and longevity of your door. Whether you’re upgrading your home’s hardware, replacing a worn-out lever, or installing one for the first time.
Following a systematic approach can save time, frustration, and potential damage to your door. This ultimate guide will walk you through every step of installing a door lever, including preparation, tools required, installation, troubleshooting, and maintenance tips.
Understanding UPVC Door Levers
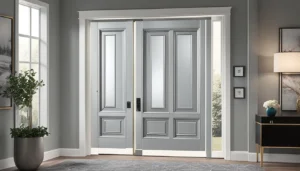
UPVC, or unplasticized polyvinyl chloride, is a popular material for doors and windows due to its durability, low maintenance, and resistance to weather conditions. UPVC doors are lightweight yet strong, making them ideal for both residential and commercial properties.
Door levers are the handles that operate the latch mechanism in your UPVC door. Unlike traditional knob handles, levers offer easier accessibility, making them suitable for people with limited hand strength or dexterity.
Before starting the installation, it’s essential to understand the components of a typical UPVC door lever set:
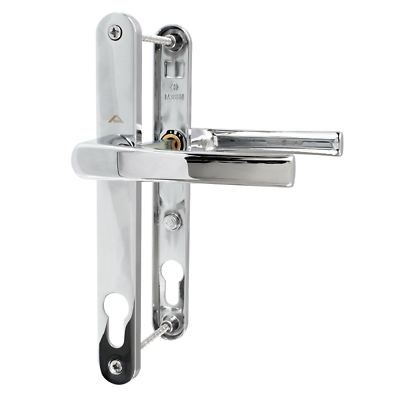
Lever Handles: The main component you grip to open or close the door. Usually, these come in pairs for both sides of the door.
Spindle: A metal rod connecting the two handles through the door, transmitting the turning motion to the latch mechanism.
Latch Mechanism: Located inside the door, this engages with the door frame to keep the door closed.
Fixing Screws: Used to secure the handles and latch in place.
Escutcheons or Rosettes: Decorative plates that cover the fixing screws for a neat finish.
Having a clear understanding of these parts will make the installation process smoother and help prevent mistakes.
Tools and Materials You’ll Need
To install a UPVC door effectively, gather the following tools and materials:
Screwdriver (typically a crosshead or Phillips type)
Tape measure or ruler
Pencil or marker for alignment
Drill with appropriate bits (optional, for new installations)
Allen key (if your lever has a set screw)
Replacement door lever set
Having all these tools ready ensures a more efficient and precise installation.
Step-by-Step Installation Process
Step 1: Remove the Old Lever (If Applicable)
If you’re replacing an existing door lever, start by removing the old handles:
Locate the screws securing the lever to the door. These are usually found under a decorative cover or escutcheon.
Remove the cover carefully to avoid damaging the UPVC surface.
Unscrew the fixing screws and gently pull the lever away from the door.
Remove the spindle and check the latch mechanism for wear or damage. If the latch is worn, consider replacing it at the same time.
Step 2: Prepare the Door
Before installing the new lever, ensure the door surface is clean and free of debris. Check that the holes for the spindle and fixing screws align with your new handle set. If you’re installing a lever on a new door, measure and mark the positions for drilling. Precision at this stage is crucial, as misaligned handles can cause operational issues.
Step 3: Install the Latch Mechanism
Most UPVC door levers operate a latch mechanism that fits inside the door:
Insert the latch into the edge of the door so that the latch faceplate aligns with the door edge.
Ensure the latch is oriented correctly – the slanted side of the latch should face the direction the door closes.
Secure the latch in place with screws provided in your lever set.
Step 4: Fit the Lever Handles
With the latch installed, it’s time to attach the lever handles:
Insert the spindle through the latch mechanism. The spindle must go through the square hole in the latch so that turning the lever will operate the latch.
Align each handle on either side of the door with the spindle.
Press the handles onto the spindle gently until they are flush with the door surface.
Some levers have a set screw on the underside of the handle. If yours does, tighten it with an Allen key to secure the handle to the spindle. Make sure not to overtighten, as this could damage the handle or the UPVC door surface.
Step 5: Secure the Handles
Once the handles are aligned and fitted:
Use the provided fixing screws to attach the handles to the door.
Ensure the screws are tightened evenly to avoid misalignment, which can cause the lever to stick or operate poorly.
Replace any decorative covers or escutcheons to hide the screws and provide a polished finish.
Step 6: Test the Door Lever
After installation, test the functionality of your new door lever:
Push the lever down to ensure the latch retracts smoothly.
Release the lever and ensure the latch springs back fully to engage with the strike plate.
Open and close the door several times to confirm smooth operation.
If the lever feels stiff or the latch doesn’t align with the strike plate, adjust the position slightly and retest.
Troubleshooting Common Issues
Even with careful installation, some common issues may arise:
Loose Handles: Tighten the screws or set screw, but check that the spindle is properly seated.
Stiff Lever: This may be due to misaligned latch or handle; slightly adjust the handle position. Lubricating the latch with a silicone spray can also help.
Latch Not Engaging: Check the alignment with the strike plate on the door frame. Minor adjustments to the strike plate may be needed.
Lever Wobbling: Ensure the fixing screws are fully tightened, and that the spindle is the correct length for your door thickness.
Maintenance Tips
A UPVC door lever, like any hardware, benefits from regular maintenance:
Lubrication: Apply a light silicone-based lubricant to the latch mechanism periodically to maintain smooth operation. Avoid oil-based lubricants, as they can attract dust and cause buildup.
Cleaning: Wipe the lever and surrounding area with a damp cloth to remove dirt and grime. Avoid harsh chemicals that can damage the UPVC surface.
Tightening Screws: Check all screws periodically to ensure they remain tight. Loose screws can cause wobbling and eventual wear.
Check Alignment: Doors can shift slightly over time. Make sure the latch continues to align with the strike plate for smooth closing and locking.
Upgrading Your Door Lever
Installing a new UPVC lever is also an opportunity to enhance your door’s style and security. Consider:
Lever Design: Choose a style that complements your home’s interior or exterior. Modern, minimalist levers or traditional designs can dramatically change the door’s appearance.
Finish: door levers come in finishes like chrome, brushed nickel, gold, or matte black. Select a finish that coordinates with other hardware.
Security Features: Some levers include integrated locks or keyless entry options, adding an extra layer of security to your home.
Conclusion
Installing a UPVC door lever doesn’t have to be intimidating. With the right tools, a clear understanding of the components, and careful attention to detail, you can install a lever that operates smoothly, looks great, and lasts for years.
By following this guide, you’ll avoid common pitfalls, ensure proper alignment, and maintain the door lever for optimal performance. Whether you’re a DIY enthusiast or tackling your first home improvement project, this guide provides the essential knowledge to complete the job confidently.
A properly installed lever enhances both the functionality and appearance of your door, making it a small investment with a big impact on your home.