6 Simple Steps to Remove Gloves Safely and Hygienically – Protective gloves are a basic part of hygiene and workplace safety. They’re used across healthcare, food service, cleaning, manufacturing, beauty services, and many other industries to reduce contact with contaminants, chemicals, and germs. But wearing gloves is only half the job. Removing them the wrong way can transfer bacteria, viruses, or hazardous substances directly onto your skin, clothing, or nearby surfaces.
Many people assume glove removal is simple: pull them off and throw them away. In reality, improper glove removal is one of the most common ways contamination spreads after a task is complete. This is especially important in environments where hygiene standards are non-negotiable, such as hospitals, laboratories, kitchens, and industrial settings.
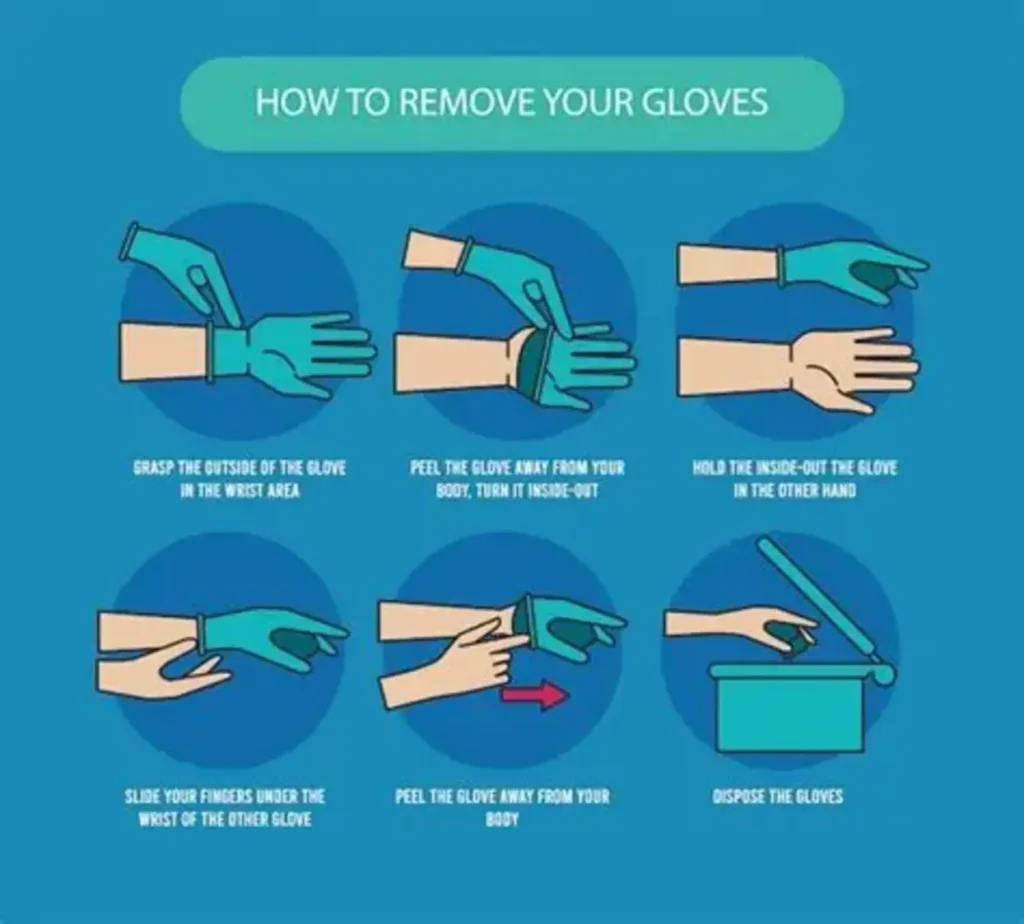
Learning the correct removal method helps protect both the user and everyone around them. Here are six simple steps to remove gloves safely and hygienically, along with practical tips for choosing gloves that support better protection.
Why Proper Glove Removal Matters
Gloves are designed to act as a barrier between your hands and harmful substances. During use, the outer surface may come into contact with bacteria, bodily fluids, chemicals, food residue, dust, or other contaminants. If you touch the outside of the glove while removing it, those contaminants can transfer to your skin.
This defeats the purpose of wearing gloves in the first place.
Proper glove removal reduces the risk of:
- Cross-contamination between surfaces or products
- Skin exposure to hazardous substances
- Spread of viruses and bacteria
- Workplace safety violations
- Unnecessary waste caused by glove misuse
Whether you use disposable nitrile gloves, latex gloves, vinyl gloves, or heavy-duty protective gloves, the removal technique should always prioritize minimal contact with the contaminated outer surface.
Step 1: Pinch the Outside of One Glove Near the Wrist
Start by keeping your gloved hands away from your face and body.
Using your opposite gloved hand, pinch the outside of one glove near the wrist area. Avoid touching your skin. The outside of the glove is considered contaminated, so only touch glove to glove at this stage.
This first grip is important because it gives you control over the glove while limiting unnecessary contact.
Tip: Pinch only a small section near the wrist to make peeling easier and reduce tearing.
Step 2: Peel the First Glove Away From Your Hand
Slowly peel the glove downward, turning it inside out as you pull it away from your hand.
Continue peeling until the glove is fully removed. The contaminated outer layer should now be folded inward, trapping contaminants inside.
Hold the removed glove in your still-gloved hand.
At this point, one hand is bare and one hand remains protected.
This inside-out turning motion is what makes glove removal hygienic. It contains contamination rather than exposing it.
Step 3: Slide Fingers Under the Remaining Glove
With your now bare hand, do not touch the outside of the second glove.
Instead, slide two fingers underneath the cuff at the wrist. Your fingers should only touch the clean inner surface of the glove.
This step is what prevents direct contact with the contaminated exterior.
Many contamination errors happen here when people instinctively grab the outside of the glove.
Take your time.
Step 4: Peel Off the Second Glove Over the First
Once your fingers are under the cuff, peel the second glove downward and away from your hand.
As you remove it, allow the glove to turn inside out while wrapping around the first removed glove still being held inside.
The second glove should fully enclose the first glove, creating a contained bundle.
This method seals contaminated surfaces inside both gloves, reducing exposure risk.
Done correctly, you will end up with a compact inside-out glove bundle ready for disposal.
Step 5: Dispose of Gloves Immediately
Used gloves should never be placed on counters, desks, carts, or in pockets.
Dispose of them immediately in the appropriate waste container.
For standard disposable gloves used in food service, cleaning, or general tasks, regular designated waste bins are often acceptable. In medical or hazardous environments, follow workplace disposal guidelines for clinical or hazardous waste.
Never attempt to wash or reuse disposable gloves unless the product is specifically designed for reuse.
Using high-quality gloves from trusted suppliers also helps reduce tearing during removal, which supports safer disposal and less accidental exposure.
Step 6: Wash or Sanitize Your Hands
Even when gloves are removed correctly, hand hygiene is still essential.
Wash your hands thoroughly with soap and water for at least 20 seconds after removing gloves. If soap and water are unavailable, use a hand sanitizer containing at least 60% alcohol.
This final step removes any contaminants that may have transferred during glove use or removal.
Gloves are not a substitute for handwashing. They are an additional protective barrier, not a complete hygiene solution.
Choosing Gloves That Support Safe Use
Safe glove removal starts with choosing the right glove for the task.
Poor-quality gloves can tear easily, fit poorly, or become difficult to remove safely. This increases frustration, waste, and contamination risk.
When selecting gloves, consider:
- Material: Nitrile offers strong puncture and chemical resistance, while latex provides flexibility and comfort. Vinyl is often used for lower-risk tasks.
- Fit: Gloves should fit snugly without restricting movement. Loose gloves can slip; overly tight gloves can tear.
- Grip: Textured fingertips improve handling in wet or detailed environments.
- Durability: High-quality gloves withstand demanding tasks without compromising safety.
Professionals often prefer reliable disposable glove products that balance comfort, durability, and protection. Investing in dependable gloves supports better hygiene practices from start to finish.
Final Thoughts
Knowing how to remove gloves safely is a simple skill with a major impact. A few seconds of careless glove removal can undo the protection gloves were meant to provide.
Pabrik sarung tangan: By following these six simple steps, you reduce contamination risks, improve hygiene standards, and create safer environments at work and at home.
To recap:
- Pinch the outside near the wrist
- Peel off the first glove inside out
- Slide fingers under the second glove
- Remove the second glove over the first
- Dispose immediately
- Wash or sanitize hands
When combined with properly fitted, high-quality gloves, these steps help ensure hygiene remains effective from the moment gloves go on until the moment they come off.