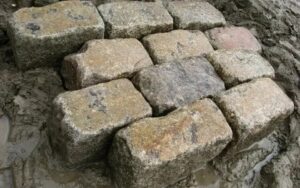
Belgium blocks, often referred to as Belgian cobblestones, are renowned for their rugged durability, classic European charm, and timeless aesthetic. Used for centuries in driveways, walkways, and as elegant edging for other paved surfaces, these granite blocks are a testament to enduring craftsmanship. However, even the most robust hardscaping materials are not immune to the effects of time, weather, and traffic. Over the years, these pavers can become loose, uneven, or damaged, compromising both the beauty and the structural integrity of the installation. For a homeowner, knowing how to repair belgium block is a valuable skill that can save time and money, and most importantly, restore the original splendor and functionality of their hardscape. This guide will walk you through the common issues, the necessary tools, and a detailed, step-by-step process for a successful DIY repair.
Understanding Common Issues and Causes of Damage
Before diving into the repair process, it is essential to first understand the common problems that can plague Belgium block installations and their underlying causes. The most frequent issue homeowners encounter is a sinking or shifting of individual blocks or entire sections. This is almost always a result of a compromised base. Inadequate compaction of the sub-base during the initial installation, water erosion from poor drainage, or the simple settling of the ground over many years can all lead to an unstable foundation. When the base beneath the blocks is no longer level or firm, the pavers will shift and create an uneven surface, which can become a tripping hazard and detract from the overall appearance.
Another common problem is the loss of sand or mortar from the joints between the blocks. This can be due to a variety of factors, including heavy rain, pressure washing, or the natural expansion and contraction of the materials. When the joint material is gone, it allows weeds to take root and grow in the gaps, which further destabilizes the pavers and can be an eyesore. Additionally, the lack of jointing material can lead to increased movement of the blocks, making them loose and susceptible to further damage. Lastly, while Belgian blocks are incredibly tough, they can still crack or chip from a heavy impact, such as a large vehicle driving over them or an errant landscaping tool. Identifying the specific problem is the first and most critical step in knowing how to repair belgium block effectively.
Tools and Materials Required for a Successful Repair
A successful repair job requires the right tools and materials. Fortunately, most of what you’ll need can be found at a local hardware store or rented for larger projects. Before you begin, gather the following items:
- Replacement Belgian Blocks: If any of the existing blocks are cracked or broken, you will need replacements. It’s wise to have a few extra on hand to ensure a good color and size match.
- Chisel and Hammer: These are essential for carefully prying up the damaged or loose blocks without harming the surrounding pavers.
- Shovel and Trowel: For removing old base material and debris, and for adding and leveling new sand or gravel.
- Rubber Mallet: Used to gently tap the new blocks into place, ensuring they are flush with the surrounding surface without chipping the stone.
- Plate Compactor or Hand Tamper: A hand tamper is sufficient for small repairs, but for larger areas, a plate compactor is highly recommended to properly compact the base.
- Kiln-Dried Sand or Polymeric Sand: This is used to fill the joints between the blocks. Kiln-dried sand is a traditional option, while polymeric sand hardens to prevent weed growth and erosion.
- Level and Straightedge: To ensure the repaired area is flat and even with the existing hardscape.
- Safety Gear: Always wear gloves and eye protection when working with heavy tools and stone.
A Step-by-Step Guide on How to Repair Belgium Block
With your tools and materials ready, you can begin the repair process. Follow these steps for a professional and lasting fix:
Step 1: Removing the Damaged Blocks Start by carefully removing the damaged or loose blocks. Use a chisel and hammer to gently pry up the blocks, working slowly to avoid damaging the adjacent pavers. If the blocks are set in concrete, this will be more difficult and may require breaking up the old concrete with a chisel and sledgehammer. For most applications set in sand, a sturdy flathead screwdriver or pry bar is all you need to lift them out. Set the removed blocks aside, marking any that you plan to reuse.
Step 2: Preparing the Base Once the blocks are removed, you will need to address the base beneath them. This is the most critical part of the repair process. Use a shovel or trowel to remove any old, loose sand or gravel. Dig out any weeds or roots you find. If the issue was a sunken area, you will need to add new base material, typically a combination of crushed stone and sand. The goal is to create a firm, level, and well-compacted base for the blocks to rest on. Use a hand tamper or plate compactor to thoroughly compact the new base material. The base must be perfectly level to ensure a smooth surface once the blocks are reinstalled.
Step 3: Reinstalling the Blocks Learn how to repair Belgium block by carefully reinstalling each piece for a smooth, even finish. Start by placing the blocks back into the prepared base, ensuring they match the size and color of the surrounding ones. Use a rubber mallet to tap them into place until level with adjacent pavers. Check alignment with a straightedge, adjusting sand underneath if blocks sit too high or low. This simple process restores both the appearance and stability of your Belgium block surface effectively..
Step 4: Refilling the Joints and Finishing Once all the blocks are securely in place, the final step is to fill the joints. This is a vital part of the process that locks the blocks together and prevents future movement. Pour your jointing sand—whether it’s kiln-dried or polymeric—over the repaired area. Use a broom to sweep the sand into all the gaps, ensuring every crevice is completely filled. After sweeping, use a plate compactor or hand tamper to vibrate the sand deep into the joints. This will cause the sand level to drop, so you’ll need to repeat the process of sweeping more sand in and compacting until the joints are completely full. Once the joints are filled, sweep away all excess sand from the surface of the blocks. If you used polymeric sand, you’ll need to lightly mist the area with water as per the product’s instructions to activate the binder and harden the sand.
Conclusion:
Knowing how to repair belgium block empowers you to maintain the aesthetic and functional value of your property for years to come. By addressing issues like shifting pavers, weed growth, and damage in a timely manner, you prevent small problems from becoming costly and extensive projects. While the process requires careful attention to detail, particularly in preparing a stable base and properly compacting the jointing sand, the result is a beautifully restored hardscape that will continue to provide timeless appeal. This guide offers a clear pathway to not only fixing the damage but also ensuring the longevity of your Belgium block installation, preserving its classic charm and durability for generations.