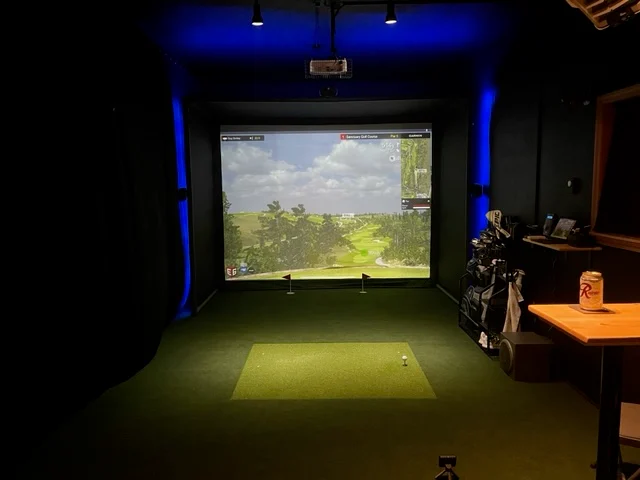
Imagine stepping into your garage, basement, or spare room and standing on the first tee within minutes. No tee times, no weather delays, no long drive to the range. That is the appeal of a home golf simulator, and it is far more achievable than most beginners think. With the right plan, you can practice, play virtual courses, and enjoy the game all year round.
Still, first-time builders often feel overwhelmed by the choices: launch monitors, projectors, screens, mats, and software. This step-by-step guide breaks the process into simple stages so you can plan your space, choose the right gear, and avoid costly mistakes.
A big part of any build is the enclosure, and that is where SimSpace comes in. SimSpace sells high quality golf enclosures and practice nets for use with golf simulators, with various sim box sizes to fit different rooms and needs. And since the enclosure is a major part of your budget, smart shoppers always check for discounts first. With SimSpace promo codes, you can save quite a bit on your purchase, leaving more room in your budget to complete your dream home golf setup.
Step 1: Measure Your Space First
Everything starts with the room. Before buying anything, measure the ceiling height, width, and depth. As a general guide, many golfers aim for a ceiling height of around 9 to 10 feet so a full swing clears safely, although taller players and driver users may need more. A width of about 12 feet gives a comfortable swing area, and you also need enough depth for the hitting spot, the ball flight, and the screen.
Before you commit, mark the hitting area with tape and take slow practice swings with your longest club. If you touch the ceiling, a light, or a wall, you need a different room or a different layout. Always check the space requirements listed by each manufacturer, since they vary between products.
Step 2: Choose a Quality Enclosure and Net
Safety comes first. A golf ball travels fast, so a sturdy enclosure protects your walls, windows, and everyone nearby. A good enclosure holds the impact screen in place, absorbs ball energy, and keeps your setup neat and organized.
This is where SimSpace is worth a close look. Its sim boxes come in several sizes, which helps when your room does not fit a standard layout. When comparing enclosures, check frame strength, screen quality, ease of assembly, and whether the dimensions match your measurements. Practice nets are also a good option if you want a simpler setup or a space you can use for more than one purpose.
Step 3: Pick the Right Launch Monitor
The launch monitor is the brain of your simulator. It tracks data such as ball speed, spin, launch angle, and carry distance, then sends it to your software. Most options fall into two types: radar-based and camera-based. They have different space requirements, and radar units generally need more depth, while camera-based units often suit smaller rooms.
Choose based on your room size, budget, and the data you actually want. Beginners rarely need the most expensive model. Reliable, consistent readings matter more than a long list of features. Read independent reviews and compare how each unit performs indoors before you decide.
Step 4: Add a Hitting Mat
A good hitting mat protects your clubs, your joints, and your floor. Look for a thick, turf-style surface that feels close to real grass and lets the club glide through naturally. A poor mat can cause jarring impacts and bad habits, so it is worth spending a little more here. Make sure the mat is large enough for your stance and sits flat and stable inside your enclosure area.
Step 5: Set Up Your Display
You will need a way to see the course. Most people choose either a projector or a large monitor. A projector creates a big, immersive image on the impact screen, but it needs the right distance from the screen and controlled room lighting. A TV or monitor is simpler and can work well in smaller spaces, as long as it is protected from stray shots.
Whichever you choose, place the display so it is safe, clear, and easy to see from your hitting position.
Step 6: Install Software and a Computer
Simulator software turns your launch monitor data into virtual courses, practice ranges, and games. Check that the software works with your launch monitor, and confirm the computer or tablet you plan to use meets its requirements. Some programs include a subscription fee, so include that cost in your total budget.
Step 7: Fine-Tune Lighting and Comfort
Good lighting makes a big difference. Dimmer lighting helps a projector image look sharp, but keep enough light so you can move around safely. Add small comforts that make the space enjoyable, such as a bench, a club rack, speakers, and floor protection around the hitting area.
When everything is installed, start with slow, partial swings. Check how the ball hits the screen, how the monitor reads your shots, and whether anything needs adjusting. Increase to full swings only when you are confident the setup is safe and stable.
Common Beginner Mistakes to Avoid
The most common mistakes are skipping measurements, buying a launch monitor that does not fit the room, ignoring safety, and underestimating the full budget. Many beginners also try to buy everything at once. It is often smarter to start with the essentials, such as a reliable enclosure from a brand like SimSpace, a suitable launch monitor, and a quality mat, and then upgrade over time.
Final Thoughts
A home golf simulator is one of the most rewarding upgrades a golfer can make. By measuring your space, choosing a safe enclosure, picking the right launch monitor, and building step by step, you can create a setup that fits your room and your budget. With a trusted enclosure supplier like SimSpace and a clear plan, you will spend less time worrying about the build and more time improving your game.
Frequently Asked Questions
How much space do I need for a home golf simulator?
Many golfers aim for a ceiling height of about 9 to 10 feet and a width of around 12 feet, plus enough depth for the hitting area and screen. Requirements vary by equipment, so always check each manufacturer’s recommendations.
What do I need for a basic home golf simulator?
A basic setup includes an enclosure or net with an impact screen, a launch monitor, a hitting mat, a display such as a projector or monitor, and simulator software. A computer or tablet is also needed to run the software.
Is a golf enclosure necessary?
An enclosure is strongly recommended. It protects your walls and people from fast-moving golf balls and holds the impact screen securely in place. Brands like SimSpace offer enclosures in several sizes to fit different spaces.
Can I set up a golf simulator in a small room?
Yes, with careful planning. Measure your space, choose a camera-based launch monitor if depth is limited, and pick an enclosure size that fits. Take slow practice swings first to make sure you have enough clearance.
How can I save money on a golf simulator setup?
Start with the essentials, compare equipment carefully, and look for discounts before buying. For example, checking SimSpace promo codes can help reduce the cost of your enclosure.