Before purchasing tile, you face an important technical choice. The terms rectified and non-rectified describe how the tile edges are finished. These manufacturing differences affect both appearance and installation difficulty. Understanding them helps you avoid surprises during your project.
Let us examine each category in detail. We will cover the production process, the installation requirements, and the best applications for each type. This knowledge will guide your decision-making.
What Are Non-Rectified Tiles?
Non-rectified tiles follow a conventional manufacturing approach. They are sometimes called cushioned-edge or soft-edge tiles. The process begins with clay pressed into a mold. The piece then fires in a kiln at high temperatures. This firing causes the clay to shrink as moisture escapes.
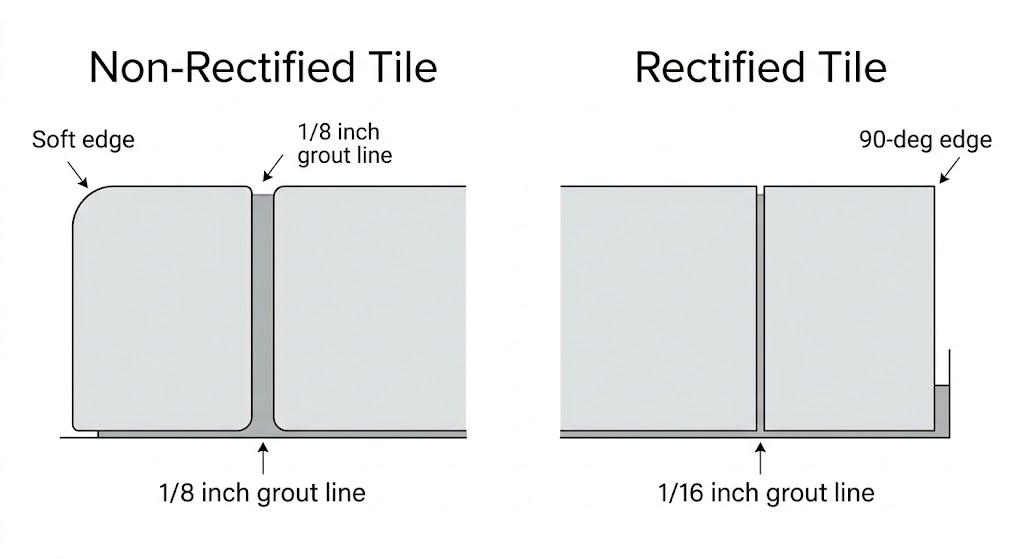
The shrinkage varies from tile to tile. No two pieces end up exactly the same size. After cooling, the manufacturer grinds the edges minimally. This grinding creates a standard nominal size. The edges remain slightly rounded and soft.
You can feel this softness by running your finger along the edge. The lack of precise uniformity means you need wider grout joints. The minimum recommended joint is 1/8 inch. Some installations require 3/16 inch to accommodate the size variations.
These tiles offer distinct advantages for certain situations. They are more forgiving on uneven surfaces. Older homes often have floors that are not perfectly flat. Non-rectified tiles can adapt to these conditions better. The softer edges also simplify cutting, which benefits beginners.
Understanding Rectified Tiles
Rectified tiles undergo the same initial firing process. But the manufacturer adds a critical additional step. After the tile comes out of the kiln, it goes to a grinding machine. This machine cuts each edge to a precise, exact dimension.
The word “rectify” means to make something right or correct. The manufacturer corrects the edges after firing. The finished product has sharp 90-degree corners and perfectly straight sides. If you touch the edge, you feel a distinct, crisp line.
Because every tile matches every other tile exactly, you can lay them very close together. This allows for very thin grout lines, often 1/16 inch or less. The narrow joints create a seamless appearance. This look is very popular in contemporary design.
The Demands of Thin Grout Lines
Thin grout lines look elegant, but they require precision. Grout serves multiple functions. It fills the gaps between tiles and conceals small installation errors. A wider grout line can hide a tile that sits slightly higher than its neighbor.
With a 1/16 inch joint, you have no margin for error. Your substrate must be perfectly flat. Any imperfection will create lippage, where one tile sits above another. With rectified tiles, lippage is not just unattractive. The sharp edge can actually cut your foot.
Proper floor preparation becomes absolutely essential. You need to check your substrate with a straightedge. Identify any dips or high spots. Self-leveling compounds may be necessary to achieve the required flatness. This preparation takes time but prevents problems later.
How Tile Size Affects Installation
Tile size adds another layer of complexity. Large format tiles have at least one edge longer than 15 inches. These oversized pieces are popular because they make rooms feel larger. Fewer grout lines mean a cleaner visual flow.
However, large tiles present significant challenges. They are heavy and rigid. They do not conform to uneven surfaces. If your subfloor has a dip, a large tile will bridge across it. This creates a hollow void underneath. These hollow spots often crack when subjected to weight.
Substrate preparation is critical for large format tiles. You must create a flat, stable surface before starting. This requirement applies to both rectified and non-rectified products. The large size demands a solid foundation.
Making Your Selection
How do you choose between these two categories? Consider your skill level and your home’s condition carefully. Non-rectified tiles work well for several scenarios. If you are a beginner, the wider joints give you room to learn. If your subfloor has minor imperfections, these tiles can handle them.
Non-rectified tiles also provide a softer, traditional look. The rounded edges suit farmhouse kitchens and classic bathrooms. The wider grout lines add texture and can improve slip resistance.
Rectified tiles suit different priorities. They excel when you want a sleek, modern appearance. You need experience with floor leveling techniques. You must be willing to purchase specialized tools. A tile leveling system with clips and wedges is almost essential.
These systems hold adjacent tiles flush while the adhesive cures. Rectified tiles also work well with contrasting grout colors. A dark grout line against light tiles creates a dramatic effect.
Choosing the Correct Grout
Your tile selection determines your grout joint width. But you must also choose the right grout type. For a 1/16 inch joint with rectified tiles, standard sanded grout will not work. The sand particles are too large for such a narrow space.
You need unsanded grout or epoxy grout. Unsanded grout is smooth and flows easily into tight joints. It is less durable than sanded grout but works well in narrow gaps. Epoxy grout offers superior strength and stain resistance. It costs more and requires quick application.
For non-rectified tiles with 1/8 inch or wider joints, sanded grout is appropriate. The sand provides structural support and prevents shrinking. It also adds a slight texture to the grout surface.
Before making a purchase, visit a local ceramic tile shop and ask for advice. Tell the staff about your specific project. Describe your floor condition and your experience level. They can recommend compatible materials for your situation.
Selecting Proper Mortar
Your mortar choice affects the installation’s longevity. Avoid the cheapest options on the market. Large format tiles are heavy and need specialized support. Look for a mortar labeled for large and heavy tile applications.
These mortars have enhanced bonding properties. They resist sagging and reduce shrinkage. Follow the mixing instructions carefully. Too much water will weaken the adhesive bond.
Final Evaluation
The choice between rectified and non-rectified products involves clear trade-offs. Rectified tiles deliver a refined, expensive appearance. They require meticulous preparation and careful handling.
Non-rectified tiles are more forgiving. They tolerate minor mistakes and surface irregularities. They may not provide that seamless slab effect, but they reduce installation stress.
Evaluate your space and your tools honestly. Consider your available time and patience. Choose the tile that fits your actual circumstances. A visit to a ceramic tile shop can provide valuable guidance. Their expertise helps you navigate these technical decisions with confidence.